Adding tables to articles is a very common requirement when you think about times that you want to show tabulated information such as lists of staff or governors information. You need to be a little careful though with tables and webpages because if you don't do it right, those tables can end up looking horrible! If your table has more than five or six columns, it is easy for it to end up looking like a Microsoft Excel spreadsheet and those don't behave very well at all on mobile phones! The rule of thumb which I like to stick to is that if your table has more than half a dozen columns, maybe it's best to have a document with a table inside it is a downloadable PDF. In this way, you can take use of the ability of Microsoft Word and all its features to make these tables look a little bit more attractive and, as downloads, there are not impacted by the issue that mobile phones experience when looking at a standard table on a webpage.
6.7.1 Creating your Table
The most common way to achieve this from scratch is to create the table using Microsoft Word and then copy the table and paste it into the article body on the website. This is quick and effective and in virtually all cases, a very reasonable layout can be achieved in almost no time at all. This section of the guide tells you all about what you can do with tables in that respect.
6.7.2 Example of a table on a webpage
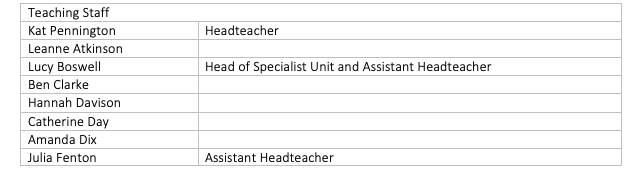
In the example below, we can see a very simple, two column table with a heading on the top and with striped effects for alternate rows. Above the table are some headings which define information about what is inside the table.

The above table was created using Microsoft Word in a very straightforward way. To achieve it, no special styling was applied, in other words, it was a pretty basic looking table in black-and-white and took about 2 to 3 minutes to create.
Note: Don't set the width of the table. Let it be the full width of your Word document page.
This table could equally have been created using Microsoft Excel:
Once you have the table created in Word or Excel, simply select all the table and copy it.
6.7.3 Adding your table to your article
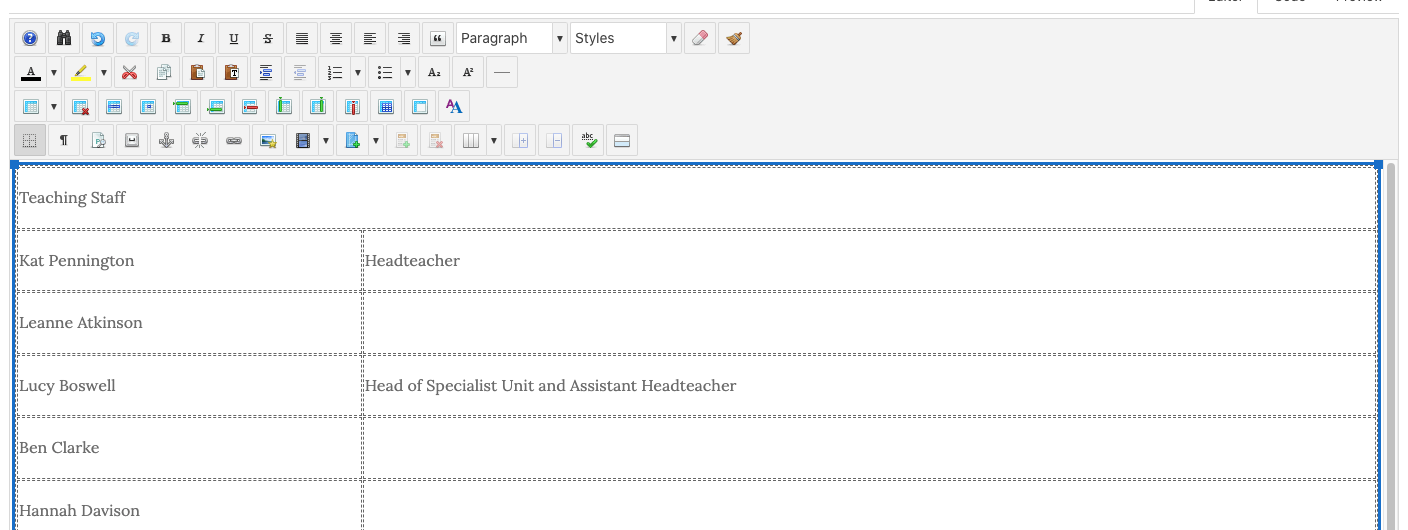
Now, go to your article and put your cursor where you would like your table to be displayed. Using standard keyboard functions CTL_V you can now paste the table which you copied from Microsoft Word or Excel directly into the article editor screen. When you do this, your editor screen will look a little bit like this - not very exciting but don't worry!
At this stage, you're pretty much complete! Usually, the first row in your table will be shown as if it were heading when you look at it in the browser (front-end) and might have a different colour background and font size. If this doesn't happen and you'd like this to be applied to your website let us know and we can apply a couple of very simple changes to the site to make it happen automatically.
Alternatively you can force the first row’s cells to be headers and we cover this below.
6.7.4 Basic editing of your table
Basic editing of the content in your table is pretty much the same as it would be in Microsoft Word. For example, you might want information in the table to be centre justified and all you need to do to achieve this is to select the appropriate data across the cells in question and then choose the appropriate justification option from the editor toolbar. This is similar for information that you might like to be shown as bold or underlined or maybe even coloured.
The same rules apply when you need to update your table with new information. For example, as new members of staff come and go you will need to update the table to reflect those changes. Editing the table is quite straightforward and obviously, if you're going to change the name of somebody in an existing row, simply edit it using the normal editing concepts of delete and replace.
6.7.5 Adding or Removing Rows / Columns
Working with rows and columns in your table is also quite straightforward and to do this we use the editor toolbar "tables" row, it looks a little bit like this with its twelve icons:

Most of the icons in this toolbar will only be highlighted when you are actually within the table itself in the editor screen; if your cursor is not inside the table, the 11 icons on the right in this row will be greyed out like this:

From left to right, the twelve table icons have the following functions:
- Create a new table
- Delete the table that you are in (place your cursor somewhere inside your table to do this)
- Set the properties for the role that you are currently on
- Set the properties for the cell (or cells) the are currently selected
- Add a row above the role where you are now
- Add a row below the road where you are now
- Remove the row where you are now
- Add a column to the left of where you are now
- Add a column to the right of way you are now
- Remove the column you are in at the moment
- Split any merged cells back into the original number of cells
- Merge the cells you have selected into one cell
So now, you can understand if you wish to add a new row, simply click your cursor into an existing row and decide whether you want to add a new row above it or below it.
Then, use one of the add a row options (5 or 6 above) to create your new row, then, simply add your content to the row.
Similarly you can do the same to add or remove columns.
6.7.6 Formatting the content in your rows and cells
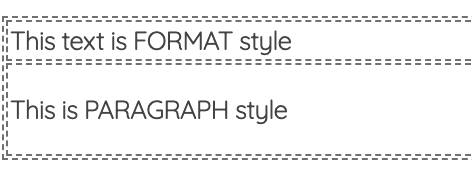
Sometimes, when you add a new row, it might look as if there is no spacing above and below the text when you compare it to its neighbouring rows. This is due to the text added not being set as Paragraph style, instead, it is basic “Format” style.
This is quite easy to fix.
Click your cursor into a cell which looks like it needs more space around it and then, choose the Format > Paragraph chooser from the top row of the toolbar. This will make of the text in the cell have more padding around it:

Perform this task for all cells which don't quite look right. Fortunately, when you bring the information in from Microsoft Word, it is automatically set as paragraph format and therefore you will likely not need to undertake this action
6.7.7 Setting a Header row or cell
If you take a look at the image below, you'll notice the top row is a single cell (this is done by using the Merge Cells icon in the toolbar) and you'll also notice it has different styling applied to it – it has a dark green background and white bold text.
This is done by setting the cell(s) in that top row to be header cells.
To make this happen, click into the cell that you want to show as a header cell ( if you want all cells in one row to look the same, drag across to select all of those cells)
Next, right click on the selected cell and choose "Cell" and then "Table Cell Properties", a pop-up will appear:
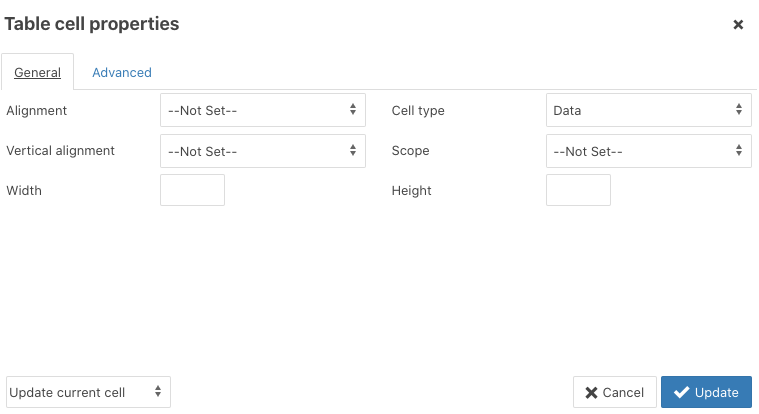
Look for the field with a label "Cell type" and note it is set for a value of Data or td.
Click into this field and choose Header or th.
![]()
Finally, click the Update button in the bottom right corner.
Equally, if you want to have a row in the middle of the table or maybe even just one cell and you wanted to stand out like the top row does, do the same by selecting the cell(s) and applying the basics above.
Now, when you save your article, and view the page in the front end of the website the cells you chose to be shown as header will have a different styling apply to them.
6.7.8 Copying a Table
If you need to copy a table within an article (to create a duplicate that you can then edit), all you have to do is click and drag across the entire table (above it to below it), just as you would in MS Word. This selects the table and its contents.
Then use CTL_C to copy the table. Next, put your cursor in the area of the article (or new/different article) where you want the duplicate to appear, hit the enter key to give a new line and then use CTL_V to paste the copied table into the article.
Finally, edit the duplicate to suit the new content, Save & Close.