We have already detailed how to add a new webpage article and here we describe how to edit an article that already exists.
6.10.1 Searching for the article
From the list of articles, search for and click the title of the article you need to edit.
You can use the Search feature to find the article if it’s easier. Type in a word from the article title - you don’t have to type the whole title in - and click the magnifying glass icon to find the articles with your chosen text.

When you see your article in the list, click its title to load it into editor mode and you will see your article text etc. in the editor panel.
Help! I see a Padlock and can't edit the article! See Section 6.17 - Troubleshooting!
6.10.2 What if you have new content to replace an entire existing page?
Imagine you have completely new content for your page (rather than fixing a small section of the article). Maybe you might have the text in a Word document so here we will show you how to copy from Word and paste it into the editor. It’s pretty straightforward!
First, select all of the text in the editor panel that is no longer relevant and of course, delete it.
Then either type in your new text or copy and paste it from a Word document.
Here’s how…
6.10.3 Pasting Article Content
Often you will want to create webpage content using Microsoft Word. You might do this in order to check for spellings, grammar or because it is simply easier that way to put your thoughts together.
Regardless of the reason why you use Microsoft Word, rather than type directly into the article editor, this help guide will provide you with support to ensure that the final result looks smart and consistent, in line with the rest of the content of your website.
Caveats
A website is not a word processor! Microsoft Word is outstanding when it comes to word processing; it allows you to choose different fonts, sizes etc. and assign those styles to different parts of text in your document. In this respect, if all you need to do is to print out such a document then Microsoft Word is clearly an application of choice. Sadly, websites were not designed to handle the very sophisticated styling which Microsoft can apply to a printed document.
Secondly, although technology has advanced considerably since website systems were first created, there are still pitfalls which can confuse website editors when they use Microsoft Word as their source for website page content. The main reason for this dilemma is that Microsoft wraps its text with Microsoft formatting instructions. This is fantastic when you need to copy and paste between different Microsoft documents but, when you paste the same information into a website page, the website has no idea how to deal with the Microsoft formatting and ultimately, given the rules it has to play with, will do its best to render the page. It frequently looks a mess though!
6.10.4 How to Copy/Paste correctly
Whether you need to copy a single paragraph or three or four pages of content from a Microsoft Word document, you can paste the information into either a new webpage article or within the body of an existing webpage article. The steps below will give you the outline which, if followed correctly, will lead to success every time.
6.10.5 Using the website formatting facilities
Let's imagine that you have copied some content from a Microsoft Word document which uses bold, underlining, headings and other styling. These look fantastic on the Word document and you would like to emulate that on the website.
First of all, follow these steps:
- Create an article or edit an article where you wish to paste this text.
- In the editor panel, use Control_V to paste the content into the panel
- The text you have pasted will then be shown in the article with all the formatting that Microsoft applied
- The next stage is to remove Microsoft formatting to make the page look more appealing.
6.10.6 Removing MS Formatting
Even if the content you see in the editor looks ok, its wise to remove any traces of MS formatting. To do this:
Select all of the pasted text in the editor
Click on the 'Remove Formatting' icon on the tool bar. This icon looks like a red tipped eraser and is usually on the top row of the toolbar:
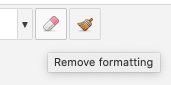
Once clicked, the selected text will have any spurious MS formatting removed. You might not see much difference in the editor screen, but the changes will be seen in the front end of the site when you visit the page.
6.10.7 What if CTL_V to paste doesn't work as planned?
If CTL_V does not paste the content into the article, use the icons shown and click on the “Paste as Plain Text” icon to see a pop-up window into which you are prompted to paste the text previously copied, using the CTRL_V keyboard shortcut (or for Mac, CMD_V). You might also be able to use the right click mouse action for this.
![]()
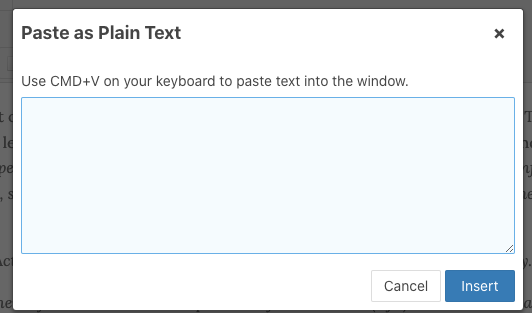
The copied text is inserted into the pop-up window.
You will see that any of the styling from the Microsoft source document is stripped out entirely (colour, font types, font sizes etc.)
Next, click on the blue Insert button at the bottom of the pop-up window.
This will close the pop-up window and the text that you added to it will be inserted at the insertion point where your cursor was within the article.
6.10.8 Sorting out pasted paragraphs
When you have pasted / inserted the content into the article editor area you might need to check through the content and simply tidy up the layout. For example, when content is added from MS Word, the paragraph breaks which Word uses are often replaced by web friendly "line breaks". On a webpage, these look very similar to paragraph breaks but they are not exactly the same and the appearance is often different. The difference is that the spacing between paragraphs is incorrect.
The spacing between the paragraphs is not showing because the conversion from Word to Web has removed the paragraph markers. To fix this in the article editor, simply place your cursor at the beginning of each new paragraph and press the enter key.
Ripple through the rest of the pasted content, putting your cursor at the beginning or end of each paragraph, and press the enter key to separate it from the paragraph above. This should only take a moment or two to achieve unless you have pasted a massive amount of text!
6.10.9 Adding Section Headings
The final stage of tidying up the content is to apply styling to main headings.
Perhaps, in our source Word content, headings were added to stand out from the rest of the body text in the page. In Word, this is done using a Microsoft heading style:

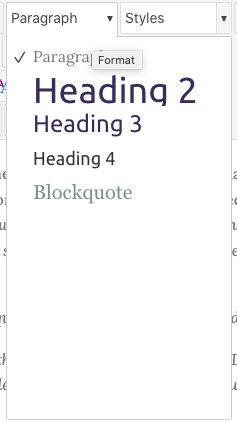
Similarly, in web technology, we have a series of predefined heading styles that can be applied to a block of text. Look at the toolbar at the top of the editor panel where you will see the drop-down style choosers:
![]()
The first (left) usually displays he word Paragraph but, it may show Format.
The second (right) will almost always show Styles – ignore it!
In order to change the text in our article so it looks like a heading, simply click your cursor on to the line where the heading needs to be displayed and then click the Paragraph drop-down to choose (for example) Heading 3:
We use Heading 3 most often because it is pre-set with a specific size, font and occasionally colour which is consistent across your website. When you have made this change, you'll notice that the text changes to reflect that you have selected it to be formatted in style Heading 3.
Note: You may well see fewer or more choices in the style chooser. Don’t worry – we often remove rarely used options!
In the editor the heading style might now be bold, larger font and/or, depending upon your own particular website settings, maybe a different style font altogether and maybe a different colour. It might look nothing like you expect but fear not, it will look fine on the front-end.
6.10.10 Saving your Changes
Once you have completed your article changes, you will use the buttons at the top of the page to commit your changes to the database and make them live on the website. Or not!
Please refer to the top series of buttons in the Article page:
