So far we have helped you to understand why large images are bad for websites. When we talk about “optimising” images for the web, you can think about images that will (or should)
- look good
- load quickly
- make images easy for search engines to index
The remainder of this section will take you through the process of resizing (optimising) pictures for use on your website from start to finish, because adding images to a website needs a little preparation.
There are a series of steps that we recommend which will make things work better for the website and for you.
7.3.1 Ready the images ready for the website
Best Practice : Its always best practice to optimise your photos etc. before you upload them to the site. Even though the website can resize your pictures for you when you upload them, doing this puts excess load in the website server that can either slow things down or (ultimately) fail the resize process altogether so, where possible we always recommend resizing the image prior to uploading them.
To optimise a large image for the website, you’ll need to reduce its size (MB) and then upload the resulting smaller version to your website (more on that below).
Starting with a large format is ideal, because you can always make a large image smaller; making a small image larger won’t work so well as it will pixelate and become grainy in appearance.
That said, there are times when you WILL want to use large images on your website, such as for your home page slideshow. In these cases, if you use low-quality images and try to blow them up to be big enough, it will look fuzzy and horrible. We cover slide shows later in this guide.
So how do you strike the right balance between size and quality? How do you even find the file size, image size, and resolution of your image?
7.3.2 Looking at your file
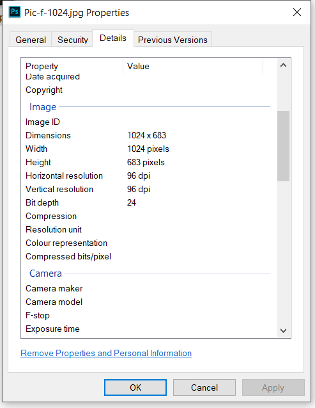
You can find the file size and image size of your photos right on your computer. If you’re on a Windows machine, right-click on the image file.
Choose “Properties” and the General tab will show you the file size in kB or MB. The “Details” tab is where you’ll see the pixel dimensions and the resolution in dpi.
This example shows that the file is 1024x683 pixels in physical size.
On a Mac right click on the image file and choose “Get Info.”
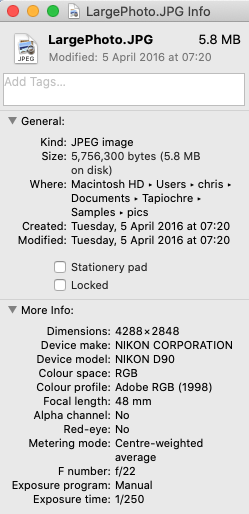
In this instance, the file is 4288x2848 pixels in size.
7.3.3 Cheat Sheet for image size, file size, and resolution
|
Application |
Size Notes |
|
Large images for slide shows or full-screen background images |
Max 1Mb |
|
Most other small web graphics |
300 KB or less |
|
Saving all images in Windows application |
If you have the option, always “Save for web” which will give your image a web-friendly resolution. |